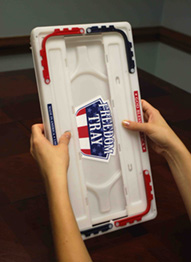
To Deploy the TRAY:
 | Step 1:
Hold firmly in both hands with drink bands facing towards you. | |
Step 2:
Place thumbs in the middle section of the tray while holding the outer edges of the long sidewalls. (Your hands should be covering the thin stickers on the top of the tray) | |
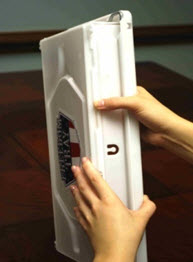
Step 3:
Using your thumbs, push down firmly until the two long sidewalls pop down. (If needed, you may need to rotate your hands and hold the tray so you can use both hands to push each of the long side walls down) | |
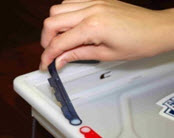
 | Step 4:
Place one hand on the bottom of the tray for support, then with your other hand snap the four snaps along the bottom edge of a long sidewall into the long edge of the tray floor. Flip the tray around and repeat on the opposite sidewall. |
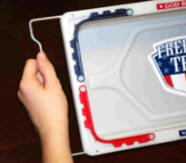
To Deploy the DRINK BANDS:
 | Step 1:
Grab the center of the drink band and lift it up and pivot it toward the center of the tray. |
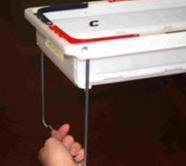
To Deploy the Legs:
 | Step 1:
Pull the legs out of the end of the tray until you see the red indicator in the windows located on each corner of the rim. It’s important to extend the tray legs all the way out until you see the red indicators to prevent the legs from coming out of the tray when you rotate them down. | |
 | Step 2:
Once you see the red indicator, rotate the legs down and snap each side of the leg into the notches on the corners of the tray floor. |
| Note: If you should accidentally pop one of your tray legs out of the holder, see Leg Reinstallation directions below. |
Optional Leg Removal:
| The legs of the Freedom Tray can be removed temporarily or permanently. (The plastics used in the Freedom Tray actually allow it to float without the legs so if it should fall overboard, it can be retrieved). If you would like to remove the legs from the tray, extend the legs out just before you see the red indicator. Then pivot the legs partially and pull them out of their axle pocket. |
Leg Reinstallation:
| To reinstall the legs you will need to pivot the tray leg so that the end fits back into the tray leg axle pocket and firmly engage it back into the axle pocket. |
To Collapse the Legs:
Note 1:
If the legs have been deployed, stow them first before collapsing the tray.
|
| Step 1:
Rotate the legs outward, unsnapping them from the notches and rotate them parallel to the Tray rim. |
Step 2:
Push the legs into the stored position in the tray rim. Tray legs are secure once they snap back over small tray leg tabs on bottom of side rims. |
To Collapse the Drink Bands:
 | Step 1:
center of the drink band and store it in the recessed corner of the tray. |
To Collapse the Tray:
 | Step 1:
If the legs have been deployed, stow them first before collapsing the tray. Holding the tray upside down, place your thumbs on the outside of the two long sidewalls and unsnap each of the 4 snaps on each side by pressing the sidewalls inward at the bottom. |
 | Step 2:
Place index fingers along end walls and collapse short side walls inward. Rotate tray and repeat. |
 | Step 3:
Grasp tray with hands on each corner of one end of the tray. Place thumbs on the bottom of the tray and press down until the tray snaps back into place. Rotate tray and repeat on opposite end. |
 USES
USES